Sunday, May 28, 2017

Setting AD Admin on Azure SQL - Permissions Issue

I have been working on automation for a particular client, and ran into an interesting issue with adding Azure AD administrators to an Azure SQL instance.  The purpose of this post is to chat a little more about how to debug this issue and ultimately fix it.

As part of my process, I generally create automation and test it using my own account and on my local machine.  Once I feel like I have something working, I move that to Azure automation.  In general, the service account that Azure Automation automatically has the same permissions as my own account (unless changed from the default).  This is true for Azure, but not true for some of the API access that may be inherently required.

The command that I am using to add a SQL Admin is Set-AzureRmSqlServerActiveDirectoryAdministrator.  Unfortunately, the MSDN docs do a pretty poor job of describing the minimum set of permissions required to run these commands.  In my automation tests, I received a cryptic "Access Denied".  At first I thought this had to do with Azure access, but that didn't make much sense.  Running the above command with the verbose flag and the debug flag yielded the following:


As you can see from the body of the response, I do not have sufficient privileges with the automation service account.  The Request is going out to the graph API and seems to be verifying that the display name actually exists in AAD before adding it.

Granting permissions to the service account is quite easy, can can be done via the Azure portal.  Navigate to AAD, click App Registrations, select the appropriate one and then click on Required Permissions.  As these permissions need to be done by the service account itself, click add and then select the Graph API.  I selected Read All Groups and Read Directory Data from the Application Permissions section.


After this, ensure to hit the Grant Permissions button at the top to make the changes permanent.  After these changes, I was finally able to add an Azure AD Admin to an Azure SQL server via script with an Azure Automation service account.

Friday, May 26, 2017

Azure Bot Service: Automation Integration via WebHooks

If you have been following along, we now have a bot that can chat on a slack channel and interact with them via prompt dialogs.  The goal of this post is to briefly discuss one method of integration with Azure Automation, which is using webhooks.

Webhooks are an effective way of starting Azure automation runbooks remotely (without the need of accessing the portal).  Essentially, using webhooks you create a magic URL that points specifically to an Azure Automation runbook.  You can configure certain run settings on the automation side, but other than that, everything else is parsed via the POST body of the request.

On the client side, one would just need to make use of the HTTPClient class to create a post request and send it to the magic link.  In some cases, you may want to augment the code below to pass in an object that is then converted to JSON.  This would be useful when trying to pass in parameters on the fly.


                    case SnapshotAllOption:
                        await context.PostAsync("Snapshotting all!");
                        using (var client = new HttpClient())
                        {
                            client.BaseAddress = new Uri(BotWebhookAddress);
                            client.DefaultRequestHeaders.Accept.Clear();
                            client.DefaultRequestHeaders.Accept.Add(new MediaTypeWithQualityHeaderValue("application/json"));
                            var response = await client.PostAsJsonAsync(BotWebhookToken,new object());
                            if (response.IsSuccessStatusCode)
                            {
                                await context.PostAsync("Successfully sent request");
                            }
                        }
                            break;


The above example simply calls out to the automation runbook when a user selects the "Snapshot All" option via the bot prompt dialog.  It inspects the result and lets the user know that the automation runbook was kicked off successfully.

This integration is quite simple, and that is the beauty of it.  The more challenging part will be how the runbook talks back to the bot to provide status.  I plan to tackle that in an upcoming post.  The following image shows what this interaction looks like in the webchat interface.


Sunday, May 21, 2017

Azure Bot Service: Basic Slack Integration

If you have been following along so far we have created a basic bot and then we have fooled around with prompt dialog as it renders in different channels.  The goal of this post is to chat a bit about basic slack integration.

Bots use the concept of bot connectors to connect with various channels.  A channel can be considered a "line of communication" with a particular client.  Configuration for the channel is done via the bot developer portal.  Here is what my dev portal looks like:

As you can see, there are several options that are built in.  One of the above is a "direct line" which could probably be used to connect with many more channels via a generic interface.  We will probably talk about that one in an upcoming post.

There are a couple of different steps when enabling slack integration.  The official documentation for this process can be found here.

Step 1: Create a Slack Application

Slack already has a built-in concept of an "application" that essentially creates a user and funnels messages to and from that user to the backend that you configure.  Visit this link to create an app.

Step 2: Add the "bot feature" to your Slack Application

Once you have your app created, you need to add the "bot feature" to this application.  This is found under the basic information tab and then the add features and functionality section.


When you create a bot, you are simply asked for the default username for the bot.  Pick anything you'd like!

Step 3: Set the Redirect URI

 This step is required in order to assist with authentication between the slack bot and the Azure bot service.  This option can be found under the OAuth & Permissions tab and the Redirect URLs.

It should look something like this:


Step 4: Configure Channel

Here, you need to basically pass in the OAuth information from slack to the bot dev portal channel configuration. 

The client id, client secret information, and verification token can be found on the Basic Information tab under the App Credentials 

From the Microsoft bot framework portal, click the slack icon to add slack to the list of channels.  Then click "edit" to be taken to the submit your credentials step of the slack integration.


Enter in the required information, and confirm the slack credentials.  After that, mark the checkbox at the bottom that will enable the bot on slack.

Step 5: Install App to your team and test

After you have enabled the bot, you can now distribute it to your team.  Do this in the slack app configuration in the Basic Information tab and the Install your app to your team section.  Once this is done, you should be able to message and interact with your app in your slack channel.

At this point, you should now be chatting with your bot via Slack.  Pretty cool stuff!

Monday, May 15, 2017

Azure Bot Service: Fooling around with PromptDialog

In a previous post I started on my journey to build a bot to handle some IT automation tasks I have been working on.  If you have been following along, you should now have a basic bot that you can test locally.  The goal of this post is to play around a bit with PromptDialog.

The prompt dialog seems like an effective and easy way to get some basic information from a user.  There are several samples that show how to use this.  At it's basic, it seems like you can use a prompt dialog to get a pick from a list of choices, a long, an int, a boolean, etc.  Here is some sample code to work with that prompts the user for a choice.

                    PromptDialog.Choice(
                        context,
                        this.AfterChoiceSelected,
                        new[] { Option1, Option2, Option3, Quit },
                        "How can I help you today?",
                        $"I'm sorry {activity.From.Name}, but I didn't understand that, can you try again?",
                        attempts: 2,
                        promptStyle: PromptStyle.PerLine,
                        descriptions: new[] { Option1, Option2, Option3, Quit }
                        );

Most of the above is pretty standard.  The second parameter passed in is a callback that should be called when the prompt is finished.  Here is a sample of my code.


        private async Task AfterChoiceSelected(IDialogContext context, IAwaitable<string> result)
        {
            try
            {
                var selection = await result;
                this.selectedChoice = selection;

                if (this.selectedChoice.Equals(Quit))
                {
                    await context.PostAsync("Quitting... Have a nice day!");
                    context.Done(this);
                    return;
                }
                
                PromptDialog.Confirm(
                    context,
                    this.AfterConfirm,
                    prompt: $"Are you sure you want to {selection}",
                    retry:$"Sorry {context.Activity.From.Name}, I didn't understand that",
                    attempts: 2,
                    promptStyle: PromptStyle.PerLine
                );
            }
            catch (Exception)
            {

                throw;
            }
        }

The other thing worth noting is the promptStyle parameter.

Okay, so now that you have the code, lets chat about a couple of things.

There is no way to quit a prompt dialog, at least that I could find....

When you kick off a prompt dialog as part of a bot interaction, it takes over control of the conversation.  As the state is carried forward automatically in the bot, the only way to exit the prompt dialog is to either pick a valid selection or exhaust the number of attempts.  While playing around, I added a "quit" option that allows the user to type quit to exit the conversation.

You should play around with promptstyle in your different channels

The prompt style parameter is a pretty interesting and neat feature.  Essentially, you are telling the channel abstraction that you are dealing with to render the choice list.  Auto doesn't always work in all cases.  Here is an example of my options in slack:

 
 As you can see, it isn't really usable since the options are cut off.  When I switched it to "PerLine" it showed up like this:

That is much more usable.  I also took a look at the "keyboard" option.  While this didn't seem to do anything material in slack, there was a cool experience in the emulator where "buttons" would show up as the responses.


Pretty cool.  Ultimately, I would think a "per channel" approach to rendering might be a better way to go if you get into complex channel visual requirements.

There is no default "confirm" in PromptDialog.Choice

While it completely makes sense, there is no "confirm" option in the prompt dialog choice object.  So essentially, once you select the option, it fires your call back.  It is up to you then to process the logic as required.  From a usability perspective, you might want to add this step.  It is pretty simple and requires two key pieces.

The first is the PromptDialog.Confirm object which allows you to prompt the user for a yes/no.  The second is the fact that you need to maintain state between interactions with the bot.  The former is shown in the code above, and the latter is easy given that the entire dialog object is serialized into state automatically.  Here is what it looks like in slack.

There is fuzzy matching on picking a number for the option, but not on the words

One thing that is kind of cool (and shown in the image above) is the user can be a little "loose" with how to reference the choices by number.  So they can use "the first one" or "first" or "one" and it will all map to the same option.  This doesn't work, at least in my testing, when trying to match the display of the option.  You have to type out the entire option if you want to select it by name.

Well, prompt dialog seems to be doing it's thing.  I know that I could tie this into LUIS and do some cool things with the natural language processing, but for my use case, this simple prompt dialog does the trick.

Sunday, May 14, 2017

Building my first Azure Bot Service

Bots are all the rage these days (or so it seems).  We used to do a similar thing way back in the day when we built IRC bots to help us manage channels, etc.  The technology has come a long way since then, and integration with LUIS make for some more interesting use cases over and above the standard "pick from this menu" type of implementation.

I think what had been holding me back from building one was a lack of a good use case to build a "real/live service".  The opportunity presented itself at one of my clients, and I decided to take it upon myself to build a working model.  Essentially the problem case is the following:

- I have built a lot of IT automation (via Azure Automation) to simplify the execution of various tasks in the environment (refreshing environments, turning environments on/off, etc)
- The team consists of technical and non-technical folks
- We are looking for an easy way to surface this automation to the end users who need it

The original thought was to build a small web page that uses post forms and integrates with Azure Automation via webhooks.  This would obviously work, but currently we use github for our internal documentation which doesn't lend itself well to this pattern.  One of the other tools in the environment is slack.  Everyone on the team is in the slack channel to facilitate discussions (we have teams in various areas around the world).  So naturally, the idea of a slack bot built on Azure Bot Service with hooks into Azure automation came to mind.  I'm hoping over the next several blog posts to detail out how I'm building this bot to satisfy this need.  Full disclaimer, this is my first bot on Azure Bot Service, so hopefully you are willing to learn with me!

With the preamble out of the way, the goal of this post is talk about getting started on the Azure Bot Framework.  The documentation is actually quite good, and this post follows closely the instructions in the bot builder quickstart for .NET.

There are three main tasks to accomplish here

  1. Install prerequisites
  2. Build/Test the standard bot template
  3. Publish/Register the bot
 Okay, lets get started.

Install prerequisites

First thing you will need is Visual Studio 2017.  You can download it from here. If you already have it, take a moment to ensure that everything is updated.  If you do not, set it to download and take the rest of the day off as it installs.

Next, you can download the bot template.  It is interesting that this isn't distributed via the online templates in VS2017.  Once you have it downloaded, you need to put the zip file in the following location %USERPROFILE%\Documents\Visual Studio 2017\Templates\ProjectTemplates\Visual C#\

Lastly, you will want to download the bot framework emulator. This emulator will allow you to test your bot locally before publishing it to the cloud.

Build/Test the standard bot template

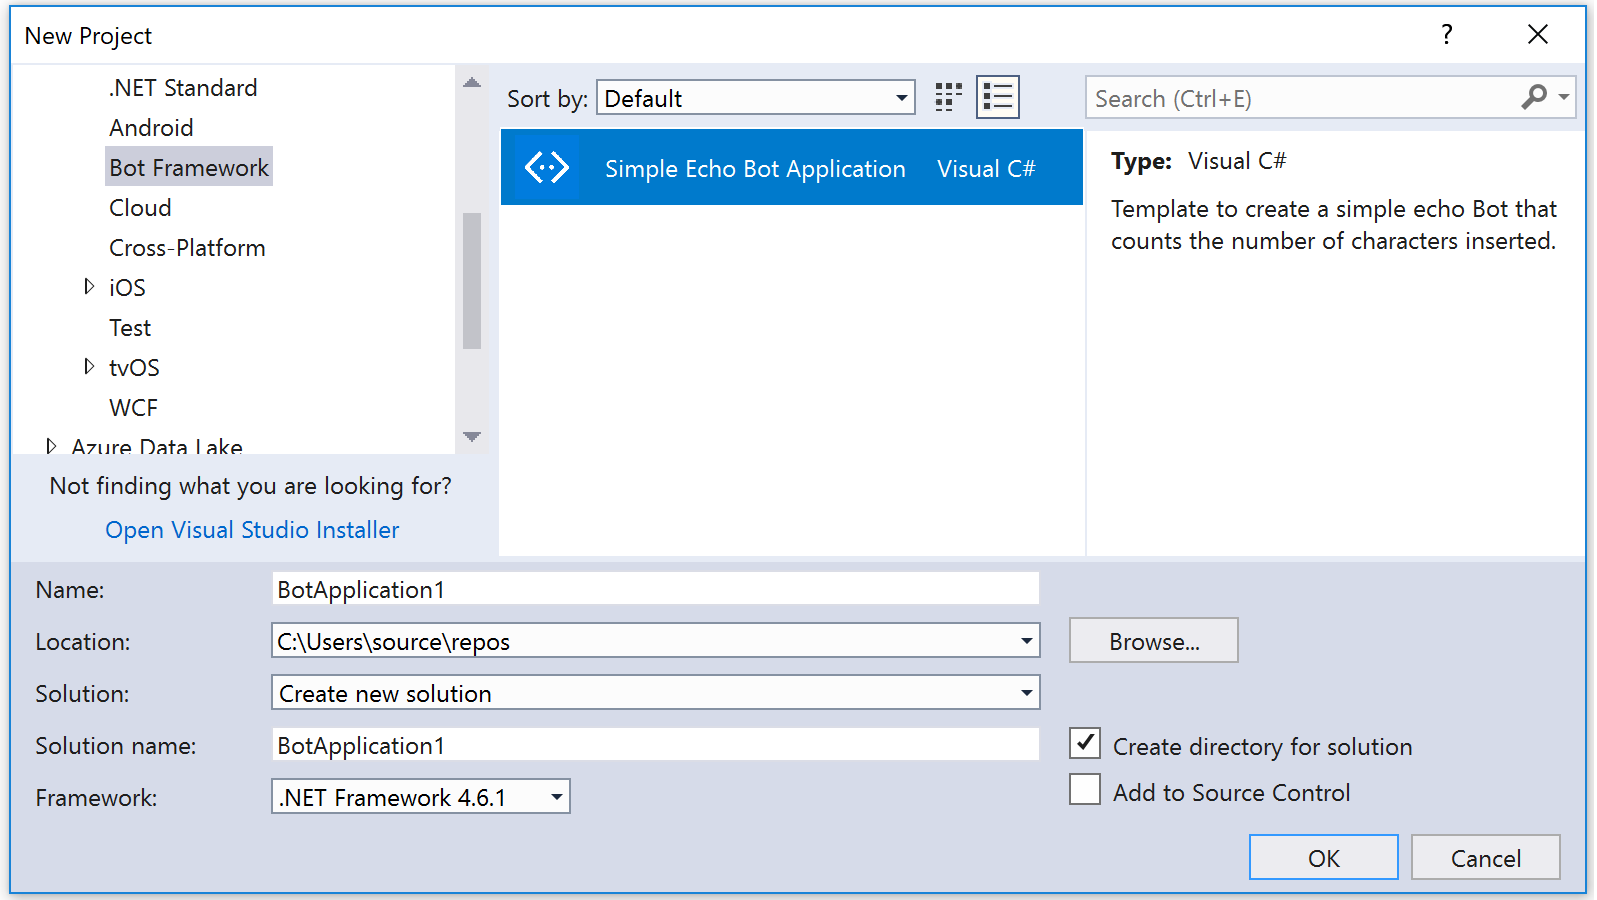
If you did everything correctly in the previous step, you should now be able to open VS2017 and create a "bot application" project type.


Once created, have a look at the code.  Bots are built upon the WebAPI framework, so if you have some experience with that it will be pretty easy to navigate.  The root logic for the bot is in the MessagesController.cs.


     await Conversation.SendAsync(activity, () => new Dialogs.RootDialog());


This line of code above in the Post method essentially creates a new conversation, and calls a dialog to handle it.  Feel free to explore the code further.

You can execute a build in a similar way to any other project, which should start up the debugger and launch Edge which is pointed at the correct endpoint.  There isn't much you can do on that page, which is where the bot framework emulator comes in.

Launch that application, and then configure it to hit your local endpoint.  Type a message and see the response.


Be sure to update it with the port you are working on and click connect

Publish/Register the bot

Now that you have tested your bot, you may want to publish it to the cloud in order to use it in more channels than the bot emulator locally.  There are a couple of steps here, most of which are documented  here.

The first thing you are going to want to do is register your bot.  In this step, you will need to provide a bot name, be assigned an app id, create an app password and provide a bot url.  The detailed instructions were fairly accurate.  It is important to note that you might not know the URL of your bot before you register it.  You can leave it blank and come back to it.

Once you have registered your bot, copy the bot name, app-id, and app password (that you created) and populate them in the web.config file of your bot application.


Please note that the botid is simply the name of your bot.  After you have done this, right click on your project and click on publish.  The wizard will walk you through connecting to your Azure account and selecting a resource group, etc for placement. 


After this is published and created, you will need to update your messaging endpoint configuration in your registration page.  If you are using the bot template, do not forget to add the "/api/messages/" to your URL path.


Once you have that done, click the large "test" button in the top right hand corner of the bot framework page to interact with your bot. 

Hopefully you enjoyed that walk through!


Thursday, May 11, 2017

Azure Metadata Service Scheduled Events: An initial look

For a little while now, the Scheduled Events functionality in the Azure Metadata service has been in preview.  I recently had a chance to play with this on a test VM and the goal of this post is to walk through some basics.

From a setup perspective, configuring scheduled events for your VM is quite easy.  All it takes is a get request from your VM after setup to a private, non-routable IP address.  As per the documentation, this server may take up to 2 minutes to initialize, so be aware of that.

There are three types of events that are handled by this server: Freeze, Restart, and Shutdown.  The idea behind the service is that you could have a task running continually to watch this endpoint waiting for events.  When it does find an event, you could handle whatever is required (say gracefully shutdown the service or fail to a secondary) and then action the event by sending a POST request back to the endpoint.  Pretty neat for being able to handle HA situations.

I found a couple of interesting things while playing around with this service.

- Deallocating a machine clears any pending events.  This makes sense based on my understanding of what deallocation actually does.  Further, when you hit the endpoint again upon reallocating the VM it seems to "re-register" with the service

- Issuing a manual restart when a restart event is pending does not clear the restart event.  This makes sense and lends itself to the documented workflow that you should ask the Azure fabric to run the pending event by "approving it"

- I also noticed that there is a resources element in the JSON file but it seems to append an _ to the resource name. See the following image:


I think there are some interesting use cases for this service.  Some thoughts that I have:

- It would be nice to see this added as part of an ARM template, maybe as a VM extension
- It will be interesting to see how this integrates with toolsets like DSC.  I would image that you would have to disable them for some period to avoid auto-correction like capabilities.  The issue with this is that you don't get an event to trigger when the scheduled event is finished (or has just finished)
- I would love to see something more global (IE: reporting in the portal along with email alerting).

It is cool to see Azure moving to deliver more host health information and this service is no different.  I think there are some workflow pieces to work out as this gets integrated into a production environment.

Wednesday, May 10, 2017

Azure Automation Runbooks: Who ran me?

One of the interesting challenges with Azure automation is enforcing security throughout the runbook process.  As I have mentioned in previous posts, permissions within the system are not super granular and automation jobs execute in a service account context.

It turns out there is a way to at determine who actually executed a particular runbook.  You could use this identity in authorization/authentication decisions within the runbook as required.  It is important to note that this is a string reference to the email address of the person running the runbook.  This is set by the system, so trust it if you wish!

The first part is to get the job id of the currently running job.  You can accomplish this by looking at the $PSPrivateMetadata object which contains a JobId.  For example,


$jobId = $PSPrivateMetadata.JobId.Guid
$jobId

The second part is using this job ID and the Get-AzureRMAutomationJob cmdlet to determine who ran the runbook.  For example,


$job = Get-AzureRmAutomationJob -Id $jobId -ResourceGroupName "resourceGroup" -AutomationAccountName "automationAccount"
$job 

Keep in mind that you do need to log in to Azure to run the above command.  After this, the output looks like this:


As you can see, there is a StartedBy property that contains my email address.  You can now use that string to make decisions in your automation runbooks.

One interesting thing to note is that "StartBy" appears blank when you use the "Test Draft In Azure" functionality of the Automation Authoring Toolkit.

Saturday, May 6, 2017

Azure Automation Development Process Considerations

In a recent post I discussed a case for multiple Azure automation accounts depending on the environment that is being targeted.  In this post, I would like to expand on some process considerations for developing on the Azure automation platform.

1) I prefer the ISE add-on modules over the built-in editor

While there are probably many methods of creating Azure Automation runbooks, the two most common are to use the build-in portal editor or the Powershell ISE Authoring Add-on.  From a development perspective, I much prefer the ISE add-on.  It has a very easy workflow for creating and testing runbooks.  When I am doing development, I am usually connected to the dev version of my automation account.  I can then do something like the following:

- Edit runbook locally (Puts runbook in EDIT)
- Upload runbook via built-in command (Puts runbook in EDIT)
- Use the built-in test to run a job
- When I'm satisfied, click on the publish command (Puts runbook in PUBLISHED)

What I really like about this method is that intellisense works on all child runbooks (provided you have them downloaded).  I have always found the intellisense in the portal version to be lacking in almost all usecases.

There are a few things that I would love to see improved in this add-on.  First of all, when you open a runbook it automatically gets put in "EDIT" mode in the portal.  I really don't like this as it should only be in edit once I have actually started editing or on first "upload" to Azure.  The second thing that is tricky is that you cannot "sync to source control" from the ISE plugin.  You can sync from, but that isn't the use case. 

In order to keep github in sync, I generally log into the portal after my edits are complete (and I'm happy with them).  From there

- Edit the runbook via the UI
- Click the Github sync button
- Click the publish button

This process is painful, and I'm hoping to build some code to create a better process.  The main blocker is the fact that the runbook used to sync automation to github (and vice versa) is not a "callable" runbook.

2) Use ARM templates to keep multiple Automation Accounts in sync

When I am doing work in Azure automation, especially when we are trying to automate IT operations, I am always trying to determine the best location for variables and credentials in the system.  Obviously Azure Automation credential store is a no-brainer, but variables can be placed in several locations depending on the need and ability of the team supporting it.  In order to keep automation accounts in sync, I find ARM templates to be the best way.  The process would look like the following:

- Make edits by hand using the portal until a pattern/process has been established
- Use the "automation script" functionality of the portal to export an ARM template
- Deploy the ARM template to test and production as required

Automation has pretty rich ARM template support, as you can see here.

3) Use workflow where possible, where not possible, use workflow anyways

I'll be honest, most of my powershell scripting these days is starting to go down the path of workflow.  While workflow can have it's challenges, I find it a much better way to write my IT automation scripts.  There are two main reasons why I tend to write workflow over regular scripts

- Parallel processing saves money
Remember that Azure Automation charges by the minute that a job is running.  In many cases, parallel processing can greatly increase the speed at which your runbooks finish.

- Easier to enforce order
I find the sequence/parallel tags in workflow a convenient way to enforce order of operations in IT automation processes.

If you are interested in learning more, there is a great resource that details some of the considerations for writing workflow in Azure Automation.